
How to produce line sets – a Meridian Medical Guide to Medical Device Manufacturing

GUIDE
Meridian Medical Limited is a contract manufacturer of medical devices. We have been producing line sets (infusion lines, anaesthetics line sets, drug delivery and solution sets) for over 30 years and, as such, would consider ourselves to be experts in the design and manufacture of these types of medical devices.
This short guide will give you a general overview of some of the aspects that should be considered during the design and manufacture process of line sets, the materials that should be used, as well as the process that should be used for their manufacture.
Preparation phase
We shall assume that, based on the fact you are reading this guide, you have already decided that a line set is required in order to perform a specific function, for example, to administer light sensitive drugs to patients. Having selected a line set solution, your first consideration should be the general Safety and Performance Requirements (SPRs), previously known as the Essential Requirements Checklist. The SPRs will be a compulsory part of your technical file submission, so it’s most beneficial when being completed or given a good once over at the start of the project. Once you have finalised your design you can then go back and fill out any blanks that could not be addressed without a complete product.
By completing this body of work at the start of your project you can build any performance, safety and test requirements into your specification at the front end. This approach saves time on redesign once you pass your device to regulatory authorities later. It should also help you answer questions such as:
- What is the purpose of the device?
- How will it be sterilised?
- How will the device be used?
- What connections does the device require?
Once you have completed the safety and performance requirements, you should have a good idea of specification of the required device. Your supplier will not require this document to produce your device, but it is a compulsory piece of work if you will be selling the device with a CE mark.
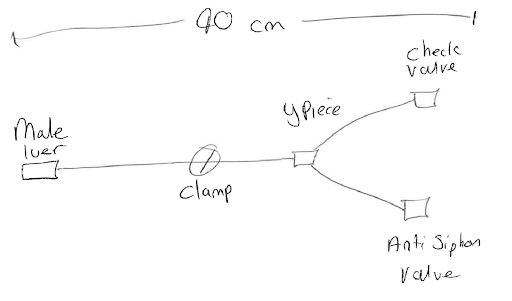
At this stage, it is most helpful if you can create a quick pencil drawing of the set, including any important notes, such as any lengths, connection types, filters, check valves and so on. This will help to create the full device specification or can be passed to your manufacturer to start the design process.
Device specification phase
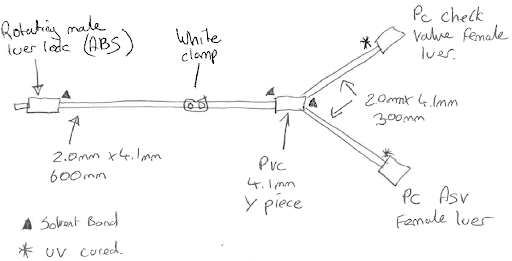
Now you have a rough idea of what type of device you need manufactured, you need to look at each of the parts in some detail. The sample set drawn above has a male luer lock to connect to a patient (however, it could connect to another machine, pump, bag etc), a length of tube, a Y piece and then two valves. The set also needs a clamp in order to stop flow. We can now start to develop the set to meet more of our specifications.
Tube size is a key question to be answered and the decision will depend on the flow rate or priming volume of the process. As a general rule, if your fluid is expensive or you need to minimise waste, and don’t need a high flow rate, then a small-bore tube should be used. Think of 0.5mm to 2mm as small bore. For higher flow applications, where fluid cost and priming volume isn’t so critical, you can use larger bore tubing, say 2mm to 4mm. When using male and female luer fittings your flow rate will be controlled in some respects by the bore size of the fittings, which means that having a much larger tube diameter will not add much performance compared to the cost.
Tube material should be considered quite carefully at this point. Maybe the material used for your set doesn’t matter or maybe it’s the most critical aspect of the set; whatever the answer it will affect the cost. If in doubt, check with your manufacturer and explain why you have chosen a particular material. It could be that you can get to the same specification another way.
Most medical device line sets tend to be made from PVC as it’s cheap, can be bonded to, sterilised and has a good shelf life. Alternatively they can be made from Silicone, PU, PE or a mixture of all the above. Tubes can be co-extruded, with PE on the inside having fluid contact, while PVC on the outside can be bonded to fittings. Silicone can be used for the whole tube, but is really expensive, fittings can’t be easily bonded to it and is very difficult to keep clean.
Tube lengths can be more or less whatever you need to meet your end requirement. Keep in mind how many fittings your line set requires and if these should be included in the overall length.
For our example line set we will be using Co-ex PVC tube (dehp free) with a PE inner line 2.0mm x 4.1mm. This will give a good flow, stop any leaching of PVC to our fluid, allow us to bond our valves and luer locks, and is a good size for preventing kinks, whilst still being suitable for clamps.
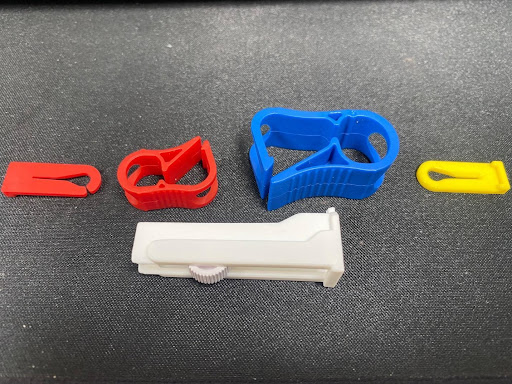
Clamps come in a few shapes and sizes (and colours). If you plan to clamp your device once, and then leave it clamped, slide clamps can be good; but consider that after a few uses they can damage the tube, and in some cases cut through it. Clip clamps are a good option for a couple of uses and some can control the reduction of flow before stopping it. Roller clamps give the best modulation of flow, at the highest cost, but work best on softer tube with a large diameter bore.
Valves, such as check valves (or back check valves), are primarily used to stop backflow from your set to your fluid origination. If you clamp the set, it could redirect fluid to an origin point and contaminate it. Anti-siphon valves are nominally closed and require pressure to open. When the pressure stops they shut. This prevents accidental downloading of the fluid (or syphoning effect) if connected to a moving fluid source (such as the bloodstream).
Luer fittings are available in multiple configurations. Most line sets start with a female luer connector of some variety and finish with a male luer connector. The female luer connector can be integral to your valve or filter, or just a standalone part. The male luer lock can be part of a valve or its own part in rotating and slip variations.
Connecting your tubes and fittings can be done in a few ways, each with their own advantages and disadvantages, and we could write a guide on this subject alone. Typically, tubes that cannot be bonded to, such as silicone or TPE, require push fitting type luer locks and fittings. You won’t be able to pressurise these sets as highly, and the break forces will be lower, but this type of connection works well for some applications. If your tube is PVC or PU you want to look at internal push fittings where you can bond the tubes inside the fitting. The tensile strength of the set will be significantly higher, less likely to leak when pressurised, and assembly can be faster.

The sterility and length of use (short term or long term) of a device will also dictate what materials and fittings will be used in its production.
If your device is not required to be sterile due to its use, then you don’t need to consider the effects of sterilisation However, if you know you will be sterilising the device, then you need to choose the materials that are compatible with your end process. Most line sets are either EtO or Gamma sterilised. Gamma is mostly used when you have poor airflow within the set, for example if it is very long, micro bore or has valves at each end. You may also have to consider Gamma if your device is for long term use (over 30 days) and the cumulative EtO residuals exceed the safe levels. This will be hard to estimate up front, without having residual data from your chosen materials to review, but is worth keeping in mind.
Most medical components are produced to be suitable for sterilisation, but check your parts are suitable for the specific type of sterilisation required.
Products intended for long term use need to be risk assessed and tested to ensure they will perform as required over the duration of use. For example, filters do not become blocked, or that repeated use of clamps does not damage tubing.
Bonding all these parts together is a critical aspect of the device design. There are several different ways this can be done, and your manufacturer will guide you as to which is best to meet your specification. Some examples are:
- Cyanoacrylate
- Solvents
- Push fit with retaining clips
- UV cured adhesive
- Activating primer and Cyanoacrylate
- Chemical etching / plasma treating and Cyanoacrylate
They all have their own place in the assembly process depending on the materials being used and the intended use of the set. UV bonding gives great results, can be applied and then cured, which is especially useful if the parts are fiddly or an instant bond fit isn’t suitable, and can be optically clear. Primer and Cyanoacrylate can be used to bond materials that are low friction. You can also use different bonding processes for every joint on your device. But don’t worry too much about the type of process that should be used to bond your parts, as your manufacturer should make sure the most effective process is used.
Once all the parts, sizes, materials and the method of sterilisation have been considered the sample drawing should be updated.
Sampling and Prototyping
You now have enough of a specification that you can create a prototype device for some initial testing. If your manufacturer produces a number of line sets already chances are they will have a number of stock components to choose from to create your sample. Another useful way of creating sample devices is to use Qosina, a component reseller that stocks thousands of medical grade parts, as well as tubing, and provides samples if you cover the shipping cost.
Sampling will give you a good idea of the ease of manufacturing your device, as well as highlighting any assembly issues. These could range from incompatibility of sizes (backcheck valves with 3.5mm tube holes and tube sizes with 3.1mm outside diameter can be a bigger problem than you would expect), or when testing the device you don’t get the performance you expect. Do not underestimate how useful sampling, testing, modifying and then resampling can be. Keep in mind that if producing one sample is difficult due to incompatibility, producing 100,000 is going to scale that issue significantly.
Testing and inspection phase
Ensuring your device meets the intended use and can be repeatably produced will require some tests. This will be highlighted in your completed SPRs. Product testing could well include many of the following (depending on your application):
- Flow rate testing
- Destructive force testing of fittings
- Leak testing
- Blocked tube testing
- Valve crack pressure testing
- Shelf-life testing
- Sterility testing
- Bioburden testing
- ETO residual testing
Some of these tests will be conducted before the device is given approval for manufacture, for example shelf-life testing, destructive force testing and valve crack pressure testing. Other tests should be done during the production phase, either on all devices or as a sample inspection. Your manufacturer will advise on a detailed test plan to meet your specifications. An example of your in-production testing could be:
- At the start of the batch, build 5 units.
- Force test each bonded joint
- All break forces 10Nm >
- If all pass, then move to production.
- Visual inspection of finished device: all bonded joints must be pushed fully home, no glue to be visible outside joints, ensure clamp facing the correct direction.
- 100 % Leak and block test device at 2Bar.
Packaging phase
Packaging your device is reasonably straightforward. Your manufacturer may have several options suitable for your device and will make suggestions based on the volume of production, shelf life, number of devices per box and method of sterilisation. At Meridian Medical we will always opt for peel pouches, as they are cost effective, can be printed or labelled, have a good shelf life, pack flat and have a clear side to show the device, which is useful for Quality Assurance.
Line sets are sterilised in the final sale boxes, so it’s beneficial to pack the products in the quantities in which you will be consuming or selling the devices. Typically, this is 10, 25 or 50 units per box. For EtO and Gamma, the more devices you have per pallet, the cheaper your sterilisation per unit becomes.
Costing phase
There are many aspects that affect the cost of your line set. Quite simply the fewer parts you use and the faster the device is to produce, the cheaper it will become. Your device may be simple but have an unnecessarily complicated testing and inspection procedure that will increase production time. By validating your production at the front end you can reduce the testing and inspection scrap during production. Overall production volume will also affect the cost, as larger volumes will generally mean better purchasing power and potentially lower overall costs. If you have a price point to meet, share this with your manufacturer and they can suggest ways to reduce cost if required.
Regulatory and Technical file
Before moving to full production, it’s very likely you will be required to submit your device file to a notified body for review. There are situations where you may not need to, such as if the set is to be used for an internal process, the device is for veterinary use, or is class 1 non-sterile. In nearly all other situations you will have to submit your technical file for review.
From our experience, Meridian Medical would strongly advise getting this approval before moving to full production. It may seem like a good idea to start building stock ready for when approval comes, but product and file audits can require product changes, add unplanned delays or additional testing. This guide does not cover all the items that are needed for a file submission as it’s a significant piece of work. If you do not know what is required there are a number of organisations that can assist with this work, or your supplier may be able to do this for you.
Full production phase
This is the home stretch of your line set project. You have your design phase complete; the samples are good and meet your test requirements, and you have the regulatory aspects all signed off. Now you’re ready to go to full production. Your first order will typically have the longest lead time as all the parts from the various suppliers need to arrive. Following your first order your supplier should be able to plan production slots to meet your required sales forecasts. Share as much forecast information as you can with your supplier. This will enable them to hold the correct stock and plan the build schedules.
We would advise planning frequent small batches to start, before going full speed into the large batch sizes. Batch size is relative to your annual requirement. As an example, if you need 10,000 products per year, a batch of 500 twice a month is a nice start. This will enable the production team to fine tune the process ready for when you need 10,000 a week.
Smaller start-up batch sizes also mean you can be more agile if required. For example, if your post-production feedback highlights changes that are required, you won’t have lots of stock to scrap, rework or sell. Or maybe your device doesn’t sell as well as expected, in which case you can reduce or cancel your future orders.
Post-production phase
Your post-production phase can be a valuable time to get feedback from your user-base. You would have had a comparatively small amount of feedback during sampling, but now that your device is out in the market you can get real life feedback from your end users. Hopefully this will be positive but take note as to the themes of the feedback, and then apply this back to your design and risk analysis. This feedback may enable you to create a range of devices, with different lengths, clamps, valves and filters, or it may require more specific product changes such as labelling, instructions for use or box quantities. Remember any significant design changes will require technical file submissions, so it’s best to plan changes in advance.
Conclusion
This guide is a quick overview of how to go about getting your line set into production and some of the back-end work your contract medical device manufacturer undertakes to create your device. Each application is somewhat unique and as such will have its own specific challenges and requirements. Your chosen medical device manufacturer may ask lots of questions to ensure they create a device that will meet or exceed your expectations and/or price point.
It is therefore vital that, if you choose to use a medical device contract manufacturer, you choose a specialist partner with the experience to correctly assess your device specification and the expertise to carry out the production to the highest standard.
Meridian Medical is an established and experienced contract medical equipment manufacturer specialising in a wide range of medical device design, development and supply services. We have over 30 years’ experience working with a number of the UK’s leading medical device companies and produce over 5 million line sets per year.
To find out more about how Meridian Medical can help you with your medical product design and manufacture, get in touch today by filling out our online form or contacting us on 01903 732344 or info@meridian-medical.com.

Case study: Supporting in-house production
How Meridian Medical works as an extension of in-house manufacturing operations to extend a customer’s production capacity.

News: Medical device manufacturing and business news
Read insights and articles on issues affecting the manufacture of medical devices, covering an array of topics.

Resources: Medical device manufacturing insights
News and insight into the world of medical device production and the contract manufacturing of medical products.